Business Finacial Group

If you regularly sell the same groups of products, you can save time by creating assemblies.
Some things just naturally go together. If you manage a fast-food restaurant, for example, you probably sell similar combinations frequently, like a double cheeseburger, fries, and a soft drink. If you run a car dealership, there are numerous ways to upsell your customers by adding accessories, maybe at a discount. Even very small businesses can bundle items. You might sell handmade jewellery and want to put together a package that includes cleaner and cleaning cloths for one price.
You can, of course, continue to sell all of those products separately. But you may find you can bump up your sales (and profits) by creating assemblies (sometimes called “kits”), bundles of items that are sold as one unit. You can build these automatically if you’re using QuickBooks Desktop Premier or above. Here’s how.
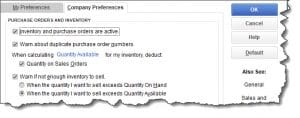
If you’re already creating item records and recording product sales in QuickBooks, you probably already have Inventory turned on. If you don’t, open the Edit menu and select Preferences. Click Items & Inventory, then Company Preferences. Make sure the boxes are checked for the options you want.

QuickBooks has several options for dealing with inventory. You should check your Preferences before you start entering sales.
CONTACT US NOW !!!
CALL US TODAY FOR A CONSULTATION!

Have Questions? Call us at (678) 799-7241 and let us show you how our expertise can save you in the long run.
Haven’t started creating item records yet? We can help with that if you have questions about how QuickBooks handles this. In fact, we encourage you to contact us about this critical process, because some of the records’ fields may be foreign to you. If you want to try it on your own, open the Lists menu and select Item Lists. Click the down arrow next to Item in the lower left corner and then click New. The New Item window will open.
Since you’re going to be building assemblies, you have to create records for all of the products that will be included. So choose the Inventory Part option under Type. Complete the rest of the fields here and click OK.
Once you have enough product records created to start building assemblies, go through the same steps you went through to open the New Item window. Rather than selecting Inventory Part under Type, though, click on Inventory Assembly. Instead of defining a single item in this window, you’ll be choosing the components that will be included. This is your Bill of Materials.
You won’t have to complete every field in this window, but several are required. Give your assembly its own Item Name/Number. Then, so you know what you’ll be pricing, jump down to the Bill of Materials window and select the items that your assembly will include in the table provided. If you completed all of the fields in the product records, QuickBooks will fill in the other columns on each line except for quantity (QTY), which you must enter.

Enter the item name and quantity for every inventory part in your assembly, and QuickBooks will fill in the rest and calculate your total cost.
When you’ve completed the table for your assembly, enter the Total Bill of Materials Cost in the Cost field above it, then supply the Sales Price that you will charge. Select the correct Tax Code and Income Account. Then go down to the bottom of the screen under Inventory Information and select the appropriate Asset Account. You’ll also need to specify at what point new assemblies should be built (minimum and maximum). There are four other fields on this line that QuickBooks will fill out once you start building assemblies and selling them.
The hard work is over now. When you want to actually start building assemblies, open the Vendors menu and click Inventory Activities | Build Assemblies. Select the kit you want by opening the drop-down menu next to Assembly Item. The items you selected will appear in the table below. QuickBooks will also display the maximum number of kits you can build given the quantity of inventory on hand. Enter the number you want in the Quantity To Build field and click the Build & Close button.
Now, when you go back to your item record, you’ll see that QuickBooks has filled in the On Hand number to reflect the assemblies you just built.

QuickBooks will keep the numbers in the lower right corner of the assembly item record updated.
The process of building assemblies may feel a little foreign at first. And if you’re going to keep some on hand, you’ll need to pay extra attention to your inventory levels, which you can do by running the Inventory Stock Status by Item report. So, this is an area where you may need to consult with us. We’re available to go over inventory and assembly concepts with you, or any other element of QuickBooks.
CONTACT US NOW !!!